

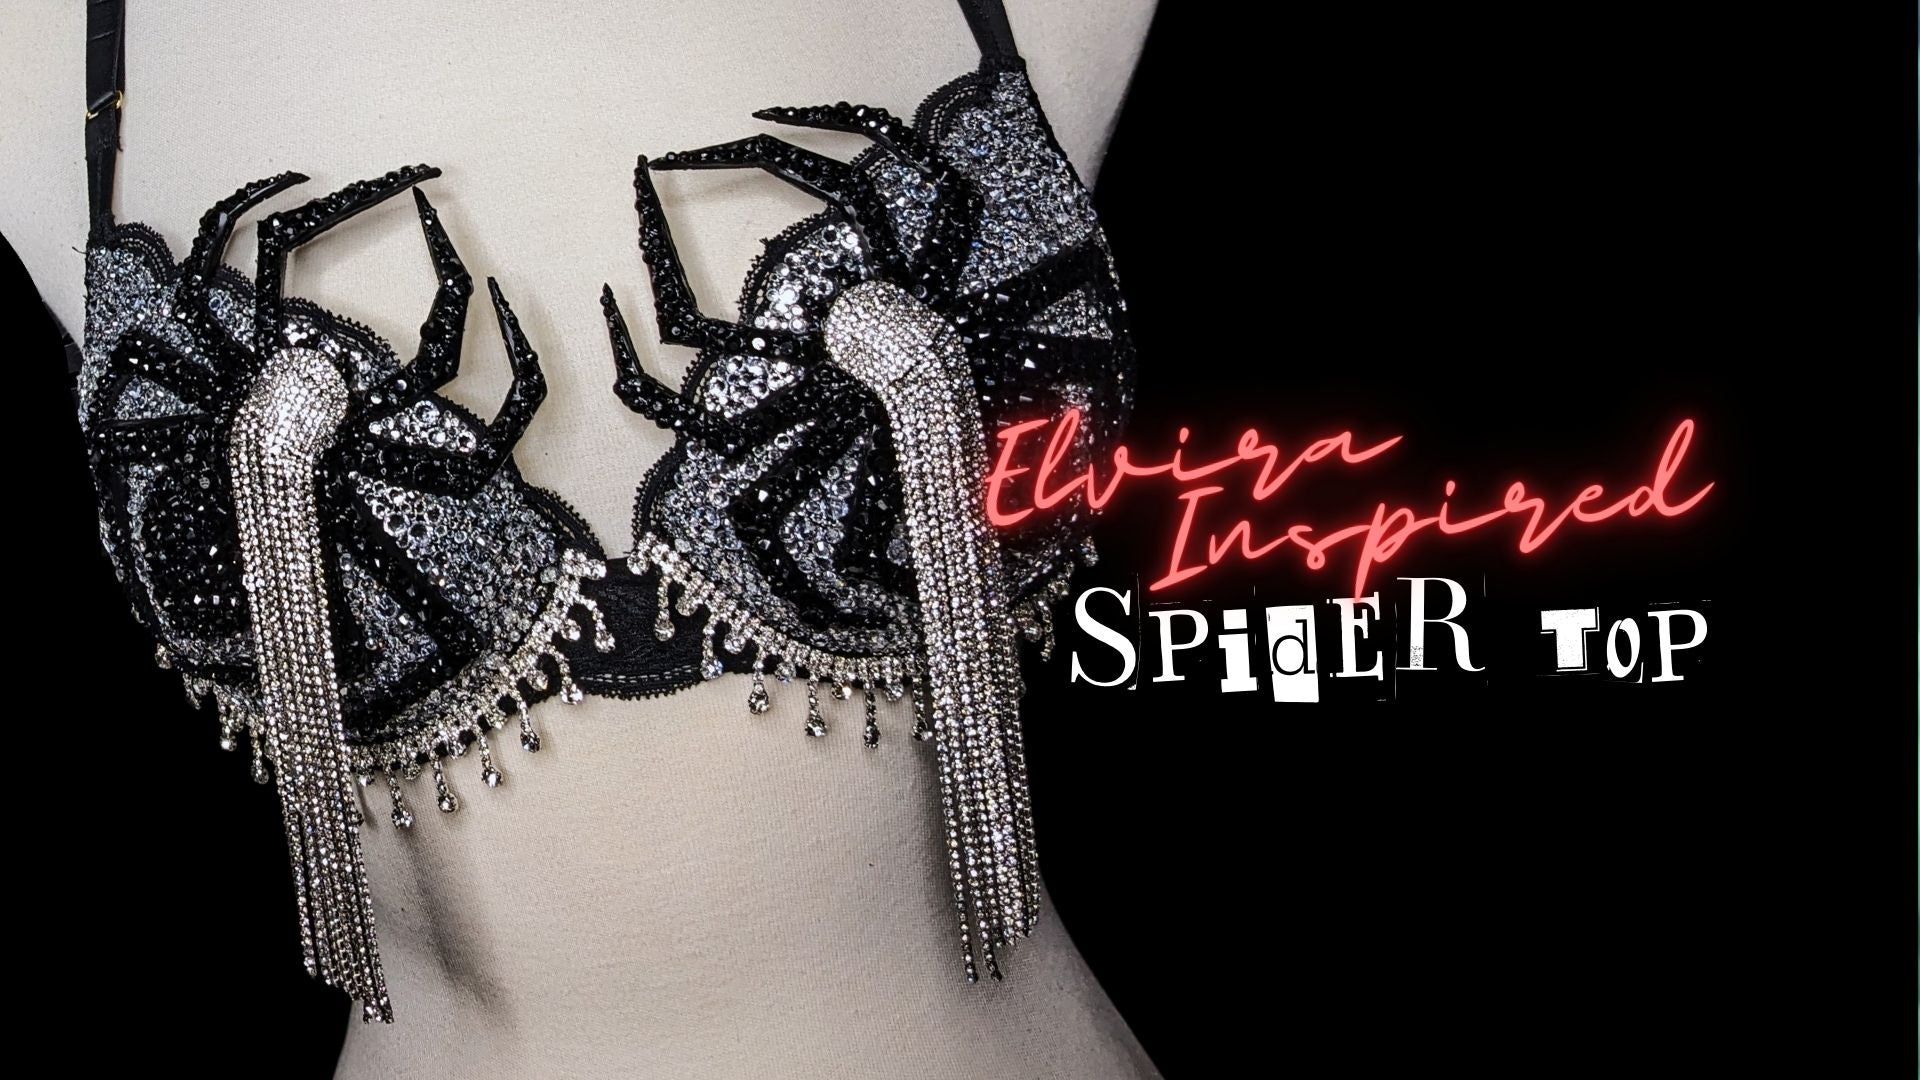

Hey, ghoulfriends! 👻 It’s time to Release the Kraftin’ and dive into this wickedly glam project! You know I’ve always had a deep love for Elvira, so when the chance came up to make a spider top inspired by her iconic look, I just had to jump at it! So grab your supplies, follow along, and let’s make some magic with a sparkly, stunning spider top worthy of the Mistress of the Dark herself.
Stay tuned for more spooky goodness by liking and subscribing! That way, you’ll be the first to know when our next creation drops! Now, let’s Release the Kraftin’!

What You’ll Need:
- 2 large spider blanks (available on our website under the Spooky Collection – grab them before they scurry away!)
- A base top with an underwire and a bit of padding (for structure)
- Heat gun
- Hand towel or Protective Gloves (for heat protection)
- Rustoleum 2x Paint + Primer in black
- E6000 glue
- Seam ripper or craft knife (to score the back)
- Clear crystals (for the bra base)
- Black crystals (for the spiders)
- Crystal fringe and crystal tassels (for added drama)

Step 1: Prepping Your Spiders
To start, we’re using two of our large spiders, but since they come flat, we need to give them a little love and heat-mold them to fit perfectly over the curves of your top.
- Heat molding: Set your heat gun to medium. Slowly wave it in circles from the back of the spider (so if it burns, it won’t damage the front detailing).
- Use a hand towel to protect your hands because the spider will get hot! Once the plastic warms up, gently press the spider to your bra, molding it with slow and even pressure. Take your time—too much heat or pressure can crack the legs or burn the plastic. Repeat for both spiders.

Step 2: Painting the Spiders
Even though we’ll be covering these babies in black crystals, you don’t want any white peeking through, so let’s give them a solid black base.
- Grab your Rustoleum 2x Paint + Primer in black and give the spiders a couple of light coats. Let each coat dry completely before moving on to the next. Two coats should do the trick!

Step 3: Attaching the Spiders
Now that your spiders are molded and painted, it’s time to attach them to the top.
- I used E6000 glue because we need something heavy-duty to hold these big creepy-crawlies in place.
- First, take a seam ripper or craft knife and score the back of each spider. This helps the glue grip better, especially since the back of the spiders is so shiny.
- Be generous with the glue and don’t worry if it spills out a bit—we’re going to cover the edges with crystals, so no one will ever see it.
- Once the spiders are glued down, clamp them in place and let them dry overnight.

Step 4: Crystals, Crystals, Crystals!
Here comes the sparkly part! Get ready for a seriously blinged-out look.
- I used clear crystals for the bra base and black crystals for the spiders. With E6000 glue, work in small sections: apply the glue, stick the crystals, then move on to the next area.
- Once the individual crystals are in place and dry, it’s time to add that extra touch of drama with crystal fringe along the edge of the bra and crystal tassels hanging from each spider. Because more sparkle = more fabulous!

Step 5: The Grand Reveal
And there she is—sparkly, gothic, and totally Elvira-approved! This stunning top is now a masterpiece of glam goth vibes, perfect for your next spooky soirée or in this case a Paris photoshoot!

Thanks for joining me on this spooky crafting adventure! I can’t wait to see your spin on this project, and I’m already thrilled for our next creative journey. Until then, keep those crafty vibes flowing! 💀🕸️✨